SVG (Scalable Vector Graphics) is a powerful image format that allows for high-quality graphics and animations on the web. When used in conjunction with Next JS, a popular React framework for building web applications, SVG can enhance the visual appeal and interactivity of your projects. In this article, we’ll explore how you can effectively use SVG in Next JS and leverage its benefits to create engaging web experiences.
What is SVG?
SVG is an XML-based vector image format that supports interactivity and animation. Unlike raster images, such as JPEG or PNG, SVGs are composed of mathematical shapes and can be manipulated using CSS and JavaScript. This makes SVG ideal for responsive design and dynamic content.
Benefits of SVG
SVG offers several advantages over other image formats.
- SVGs are small in file size, which contributes to faster page loading times.
- They are resolution-independent, ensuring sharp and crisp visuals on any device or screen size.
- SVGs are accessible and can be styled and animated using CSS, allowing for creative freedom and interactivity.
Also Read: Next JS Project Ideas to Boost Your Portfolio
How to Use SVG in Next JS?
Next JS, a popular React framework, provides a solid foundation for building modern web applications. Integrating SVG in Next JS is straightforward, thanks to the seamless compatibility between React and SVG. Let’s look at the best ways to add SVG in NextJS App.
1. Importing the SVG files In Next JS
You can import SVG files directly into your components. Next JS treats SVG files as static assets, allowing you to reference them like any other image file. This enables you to leverage the benefits of SVG while maintaining the convenience of Next JS development.
import Image from 'next/image';

import svgIcon from '../assets/icon.svg'

function MyComponent() {
  return (
    <div>
      <Image
        src={svgIcon}
        alt="My SVG"
        width={200}
        height={200}
      />
    </div>
  );
}
2. Use SVG files from Public Folder
You can also use the SVG files in Next JS Image Component by keeping the SVG file in your public folder of Next JS. Here is an Example
import Image from 'next/image';

function MyComponent() {
  return (
    <div>
      <Image
        src="/assets/icon.svg"
        alt="My SVG"
        width={200}
        height={200}
      />
    </div>
  );
}
3. Inline SVGs in Next JS
In addition to importing SVG files, you can also use inline SVGs directly in your Next JS components. This approach offers greater flexibility, as it allows you to manipulate the SVG markup and apply CSS styles or JavaScript animations. To use inline SVGs, follow these steps:
- Create an SVG file, for example,
my-svg.svg, in your project directory. - Open the SVG file and copy its contents.
- In your Next.js component, use the
dangerouslySetInnerHTMLprop to insert the SVG markup:
function MyComponent() {
  return (
    <div dangerouslySetInnerHTML={{ __html: `
      <!-- Paste your SVG markup here -->
    ` }} />
  );
}
4. SVG Components in Next JS
Next JS encourages the use of reusable components. You can create SVG components that encapsulate specific graphics or icons. These components can be easily imported and utilized across different pages or components, promoting code reusability and maintainability.
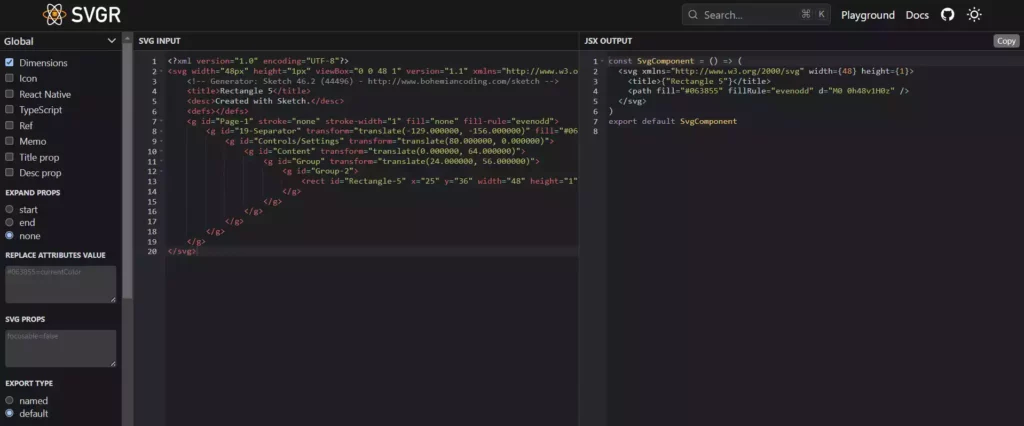
You can also easily Convert Your SVG Files into an SVG Component. Just copy the SVG file code and go to SVGR Playground. Now Paste Your Code on the left side and it will convert it to an SVG Component. Copy the SVG Component code and use it in your NextJS project like any other component

Also Read: How to add Next JS Redirect
How to Style SVGs in Next JS
SVGs can be styled using CSS, enabling you to apply colors, gradients, and animations to your graphics. In Next.js, you can style SVGs using standard CSS techniques. Here’s an example:
import styles from './MyComponent.module.css';

function MyComponent() {
  return (
    <div>
      <svg className={styles.mySvg} xmlns="http://www.w3.org/2000/svg" viewBox="0 0 100 100">
        <circle cx="50" cy="50" r="40" />
      </svg>
    </div>
  );
}
In this example, we import a CSS module, MyComponent.module.css, which contains a class, mySvg, defining styles for the SVG. By applying CSS classes or inline styles to your SVG components, you can achieve visually stunning effects and create a cohesive design language for your Next.js application.
Also Read: Next JS vs React: Which One Should You Choose?
Animating SVGs in Next JS
SVGs offer powerful animation capabilities, allowing you to bring your graphics to life. In Next.js, you can animate SVGs using CSS or JavaScript libraries like GreenSock Animation Platform (GSAP) or React Spring. Let’s take a look at an example of animating an SVG using CSS transitions:
import styles from './MyComponent.module.css';

function MyComponent() {
  return (
    <div>
      <svg className={styles.mySvg} xmlns="http://www.w3.org/2000/svg" viewBox="0 0 100 100">
        <circle cx="50" cy="50" r="40" className={styles.circle} />
      </svg>
    </div>
  );
}
/* MyComponent.module.css */
.circle {
  transition: transform 0.5s ease-in-out;
}

.circle:hover {
  transform: scale(1.2);
}
In this example, the SVG circle scales up when hovered over, thanks to the CSS transition. By leveraging CSS animations or JavaScript libraries, you can create captivating and interactive SVG animations that enrich the user experience of your Next.js application.
Conclusion
Integrating SVG into your Next JS projects can significantly enhance the visual appeal and interactivity of your web applications. By leveraging the power of SVG’s scalability, responsiveness, and animation capabilities, you can create engaging and dynamic user experiences. Remember to optimize SVGs for performance, consider accessibility and SEO best practices, and unleash your creativity using SVG in Next.js.
You may also like
Next JS vs React: Which One Should You Choose?

Aug 30, 2025
·4 Min Read
When it comes to building web applications, React is one of the most popular frameworks out there. But with the emergence of Next JS, many developers are left wondering which one they should choose. In this article, we’ll see Next JS vs React to help you decide which one is best for your project. Next.js […]
Read More
How to add Styled components in Next.js App router

May 11, 2024
·4 Min Read
Styled components have become a popular choice for styling React applications due to their simplicity and flexibility. When it comes to integrating styled components into a Next.js application, it’s essential to understand how to leverage them effectively within the app router. In this guide, we’ll explore step-by-step how to add styled components to a Next.js […]
Read More
How to add Google Web Stories in Next JS

Dec 14, 2023
·10 Min Read
In the fast-paced digital world, user engagement is key to the success of any website. One effective way to captivate your audience is by incorporating Google Web Stories into your Next JS website. These visually appealing and interactive stories can make your content more engaging and shareable. In this comprehensive guide, we’ll walk you through […]
Read More
How to send Emails in Next JS for Free using Resend

Nov 10, 2023
·7 Min Read
Sending emails in web applications is a crucial feature, and in this article, we will explore how to send Emails in Next JS for free using Resend. Next JS is a popular framework for building React applications, and Resend is a handy tool for email integration. By the end of this guide, you’ll have the […]
Read More
How to add Google Login in Next.js with Appwrite

Nov 01, 2023
·7 Min Read
Are you looking to enhance user authentication in your Next.js application? Integrating Social Login with Appwrite can be a game-changer. Add Google Login to your Next.js app with Appwrite. This article will guide you through the process, and practical tips to add Google Login in Next.js with Appwrite. GitHub Code: Google Login in Next.js with […]
Read More
How to add Protected Routes in Next JS

Oct 28, 2023
·5 Min Read
In the world of web development, security is paramount. Whether you are building a simple blog or a complex web application, protecting certain routes and pages from unauthorized access is a crucial step. In this comprehensive guide, we will walk you through the process of adding protected routes in Next JS, ensuring that your web […]
Read More


